Sedum ‘Autumn Joy’ (also called ‘Herbstfreude’) is a fleshy perennial plant. In this article we will learn how to divide sedum ‘Autumn Joy’ and get new plants for free.
It forms a group of unbranched stems covered with succulent gray-green leaves.
In late summer it produces flattened buds containing numerous tiny flowers. These flowers are star-shaped and their color changes from pink when they appear to dark red when they mature. Bees and butterflies love sedum flowers.
They are extremely drought resistant plants storing water in their succulent leaves. Thus, they can tolerate sandy soils and hot, dry places.
Its mode of growth, releasing new shoots from the base year after year, makes this plant easily propagated by division.
In this article we are going to learn how to divide Sedum ‘Autumn Joy’ and see how easy it is to do it. We will use a potted specimen for the demonstration, but the method applies equally to larger specimens growing in the garden.

In this article
When is the best time to divide Sedum?
The best time to divide sedum is early spring when the plant shows the first signs of growth. This way, it will quickly recover from the split.
Can I divide Sedum in the fall?
Theoretically, Sedum can be divided from autumn to the beginning of spring, but in colder and more humid areas, if we do it too early, we increase the risk of the plants to rot.
Raise the plant
This plant has been growing in this pot for some time and needs repotting. I take the opportunity to divide it. This is the right time, when new growths are already visible.

I first remove the plant from the pot to inspect the roots. It really needs to be potted in fresh compost. Drainage looks like an issue here.

I cut the stems from last year’s flowers.

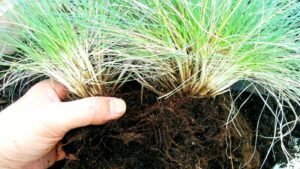
Separating Sedum roots
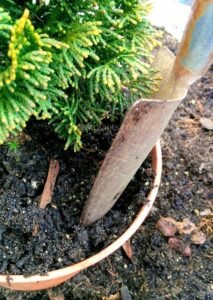
With the help of the hand shovel, I cut the root ball into two parts.

I then obtain two similar plants, with good roots and enough shoots to develop during the next growing season.

With the help of a little stick, I carefully loose the roots at the edges so that they can make better contact with the soil in the new pot.

Plant the divisions
I plant each new Sedum ‘Autumn Joy’ in an individual pot with fresh, loose, very draining compost.

Finally, we must water and protect the newly divided plants mainly from rain and frost.

Did you find this article useful? Do you have any questions? Ask us in the comments area below.